Chapter 0: Introduction & Setup
Topics
- Mongod
- Authentication
- Database Logs
- High Availability(by replicating)
- Scalability(sharding)
Chapter 1: The Mongod
The Mongod
Clinet <-> Mongod(Deamon)
mongod listens on port 27017
database files are stored in the directory /data/db/
Start MongoDB
$ nohup mongod -f etc/mongod.conf &
mongod.conf
dbpath = ./data
logpath = ./log/mongod.log
To create a new collection
db.createCollection("employees")
kill mongod by mongo shell
use admin
db.shutdownServer()
dbpath
$ mongod --dbpath <directory path>
auth
$ mongod --auth
Configuration File
YAML conf file
Launch mongod using default configuration:
mongod
Launch mongod with specified –dbpath and –logpath:
mongod --dbpath /data/db --logpath /data/log/mongod.log
Launch mongod and fork the process:
mongod --dbpath /data/db --logpath /data/log/mongod.log --fork
Launch mongod with many configuration options:
Note that all “ssl” options have been edited to use “tls” instead. As of MongoDB 4.2, options using “ssl” have been deprecated.
mongod --dbpath /data/db --logpath /data/log/mongod.log --fork --replSet "M103" --keyFile /data/keyfile --bind_ip "127.0.0.1,192.168.103.100" --tlsMode requireTLS --tlsCAFile "/etc/tls/TLSCA.pem" --tlsCertificateKeyFile "/etc/tls/tls.pem"
Example configuration file, with the same configuration options as above:
storage:
  dbPath: "/data/db"
systemLog:
  path: "/data/log/mongod.log"
  destination: "file"
replication:
  replSetName: M103
net:
  bindIp : "127.0.0.1,192.168.103.100"
tls:
  mode: "requireTLS"
  certificateKeyFile: "/etc/tls/tls.pem"
  CAFile: "/etc/tls/TLSCA.pem"
security:
  keyFile: "/data/keyfile"
  authorization: enabled
processManagement:
  fork: true
mongod --config "etc/mongod.conf"
mongod -f "etc/mongod.conf"
Lab: Configuration File
conf
net:
  port: 27000
security:
  authorization: "enabled"
start server
mongod -f mongod.conf
create an admin user
mongo admin --host localhost:27000 --eval '
  db.createUser({
    user: "m103-admin",
    pwd: "m103-pass",
    roles: [
      {role: "root", db: "admin"}
    ]
  })
'
File Structure
Don’t modify the files in the db data directory.
WiredTiger.lockis the process lock file.- *.wt are the collections files.
- diagnostic.data(used by MongoDB support engineers)
- journal: recovering data from journal files
List socket file:ls /tmp/mongodb-27017.sock
Basic Commands
Basic Helper Groups
db.<method>() # interact with db
db.collection.<method>()
rs.<method>() # control replica set deployment and management.
sh.<method>() # control sharded deployment and management.
User management
db.createUser()
db.dropUser()
Collection management commands:
db.<collection>.renameCollection()
db.<collection>.createIndex()
db.<collection>.drop()
Database management commands:
db.dropDatabase()
db.createCollection()
Database status command:
db.serverStatus()
Creating index with Database Command:
db.runCommand(
  { "createIndexes": <collection> },
  { "indexes": [
    {
      "key": { "product": 1 }
    },
    { "name": "name_index" }
    ]
  }
)
Creating index with Shell Helper:
db.<collection>.createIndex(
  { "product": 1 },
  { "name": "name_index" }
)
Introspect a Shell Helper:
db.<collection>.createIndex
db.runCommand({<command>})
db.commandHelp("<command>")
Get the logging components:
mongo admin --host 192.168.103.100:27000 -u m103-admin -p m103-pass --eval '
  db.getLogComponents()
'
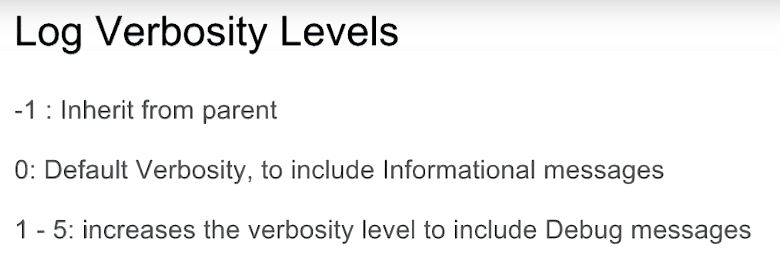
Change the logging level:
mongo admin --host 192.168.103.100:27000 -u m103-admin -p m103-pass --eval '
  db.setLogLevel(0, "index")
'
View the logs through the Mongo shell:
db.adminCommand({ "getLog": "global" })
View the logs through the command line:
tail -f /data/db/mongod.log
Update a document:
mongo admin --host 192.168.103.100:27000 -u m103-admin -p m103-pass --eval '
  db.products.update( { "sku" : 6902667 }, { $set : { "salePrice" : 39.99} } )
'
Look for instructions in the log file with grep:
grep -i 'update' /data/db/mongod.log
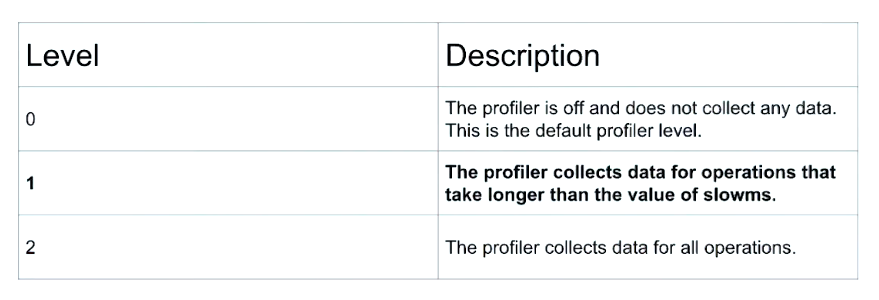
Profiling the Database
Profiling is used to optmize queries. Debugging query.
The database profiler collects detailed information about Database Commands executed against a running mongod instance. This includes CRUD operations as well as configuration and administration commands. The profiler writes all the data it collects to a system.profile collection, a capped collection in each profiled database.
To list all of the collection names you can run this command:
db.runCommand({listCollections: 1})
Get profiling level:
mongo newDB --host 192.168.103.100:27000 -u m103-admin -p m103-pass --authenticationDatabase admin --eval '
  db.getProfilingLevel()
'
Set profiling level:
db.setProfilingLevel(1)
Show collections:
db.getCollectionNames()
Set slowms to 0:
db.setProfilingLevel( 1, { slowms: 0 } )
Insert one document into a new collection:
db.new_collection.insert( { "a": 1 } )
Get profiling data from system.profile:
db.system.profile.find().pretty()
Basic Security: Part 1
Authentication: Who you are? Identify.
Authorization: What you can do? Verify the privileges of a user.
Authentication Mechanisms
- SCRAM(default)
- X.509(certificate)
MongoDB Enterprise Only
- LDAP
- Kerberos
Cluster Authentication
Course: M310: MongoDB Security
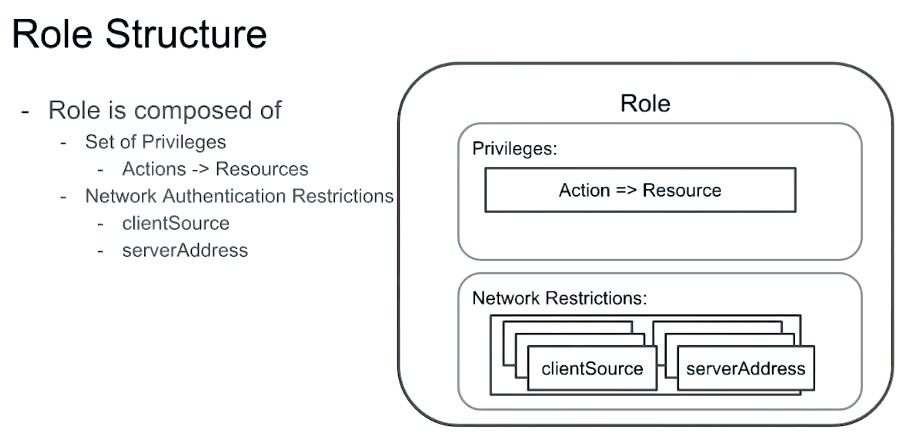
Authorization: Role Based Access Control
-
Each user has one or more roles
-
Each role has one or more privileges
-
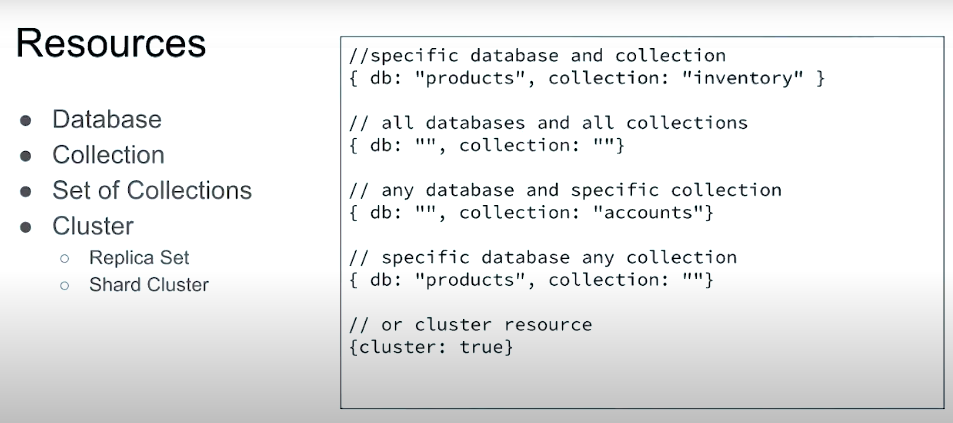
A privilege represents a group of Actions and the Resources those actions apply to
-
Administrator(create user/index)
-
Developter(read and write data)
-
Data Scientist(read data only)
Create a admin first Always! Create new user with the root role (also, named root):
use admin

db.createUser({
  user: "root",
  pwd: "root123",
  roles : [ "root" ]
})
Connect to mongod and authenticate as root:
mongo --username root --password root123 --authenticationDatabase admin
db.stats()
Bob@inventory and Bob@sales, which are two different users.
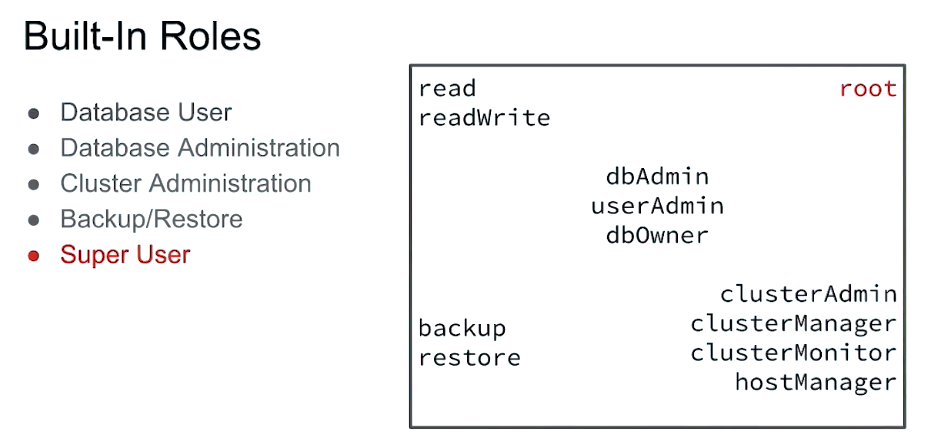
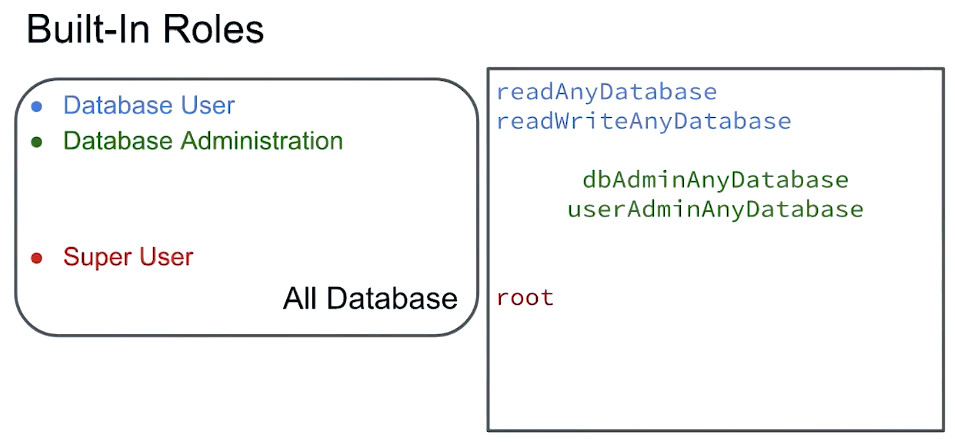
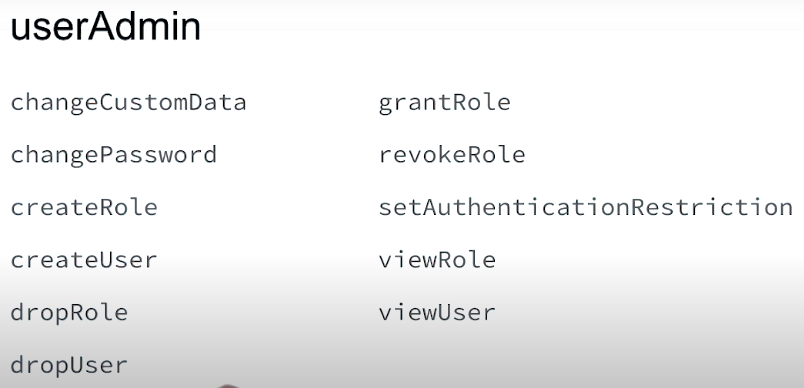
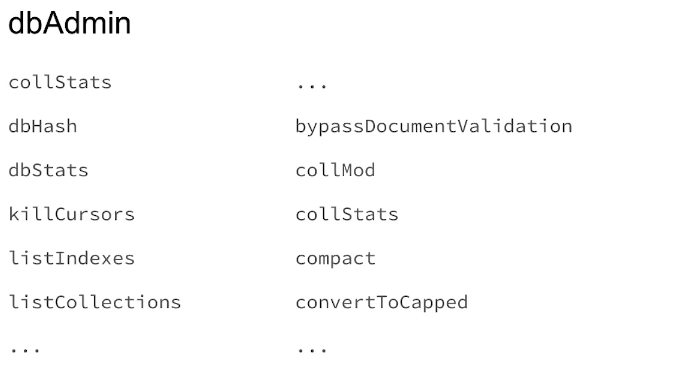
Built-in Roles


- Database User
- Database Administrator
- Cluster Administrator
- Backup/Restore
- Super User
Built-In Roles: Part 2
Authenticate as root user:
mongo admin -u root -p root123
Create security officer:
db.createUser(
  { user: "security_officer",
    pwd: "h3ll0th3r3",
    roles: [ { db: "admin", role: "userAdmin" } ]
  }
)
Create database administrator:
db.createUser(
  { user: "dba",
    pwd: "c1lynd3rs",
    roles: [ { db: "admin", role: "dbAdmin" } ]
  }
)
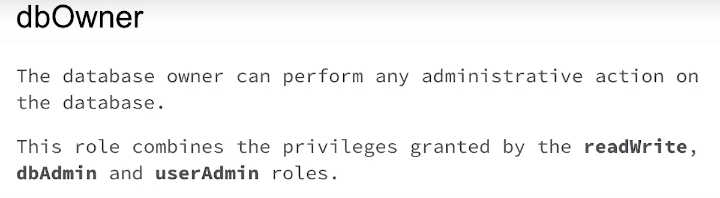
Grant role to user:
db.grantRolesToUser( "dba", [ { db: "playground", role: "dbOwner" } ] )
Show role privileges:
db.runCommand( { rolesInfo: { role: "dbOwner", db: "playground" }, showPrivileges: true} )
Lab: Creating First Application User
Problem:
Create a new user for an application that has the readWrite role:
-
Connect to a mongod instance that is already running in the background on port 27000. You can find the options used to launch mongod in the configuration file in your file editor. The m103-admin user has also already been created for you with password m103-pass.
-
Use the db.createUser() command to create a user for a CRUD application. The requirements for this new user are:
- Role: readWrite on applicationData database
- Authentication source: admin
- Username: m103-application-user
- Password: m103-application-pass
-
Click “Run Tests” to run a suite of tests that will check the configuration of m103-application-user. The results of these tests will let you know which steps you’ve yet to complete.
answer:
mongo --port 27000 admin -u m103-admin -p m103-pass
> use admin
> db.createUser(
    { user: "m103-application-user",
      pwd: "m103-application-pass",
      roles: [ { db: "applicationData", role: "readWrite" } ]
    }
  )
Server Tools Overview
- mongostat
- mongodump
- mongorestore
- mongoexport
- mongoimport
ls bin/mongo*

mongostat --port 30000
// or
./bin/mongostat --authenticationDatabase "admin"  -u root -p root123
Create new dbpath and launch mongod:
mkdir -p ~/first_mongod
mongod --port 30000 --dbpath ~/first_mongod --logpath ~/first_mongod/mongodb.log --fork
Use mongostat to get stats on a running mongod process:
mongostat --help
mongostat --port 30000
Use mongodump to get a BSON dump of a MongoDB collection:
mongodump --help
mongodump --port 30000 --db applicationData --collection products
ls dump/applicationData/
cat dump/applicationData/products.metadata.json
Use mongorestore to restore a MongoDB collection from a BSON dump:
mongorestore --drop --port 30000 dump/
Use mongoexport to export a MongoDB collection to JSON or CSV (or stdout!):
mongoexport --help
mongoexport --port 30000 --db applicationData --collection products
mongoexport --port 30000 --db applicationData --collection products -o products.json
Tail the exported JSON file:
tail products.json
Use mongoimport to create a MongoDB collection from a JSON or CSV file:
mongoimport --port 30000 products.json
Lab: Importing a Dataset
Problem:
Import a dataset into MongoDB using mongoimport:
- Run a mongoimport command on a MongoDB instance running in the background.
The requirements for this command are:
- connect to a mongod process running on port 27000 import the data from /dataset/products.json
- import the data to applicationData.products
- use m103-application-user to authenticate to the database - this user has already been created for you on the admin database with password m103-application-pass
- Click “Run Tests” to run a test that will check applicationData.products for the new data. The results of these tests will let you know which steps you’ve yet to complete.
answer
$ mongoimport --authenticationDatabase admin \\
-u "m103-application-user" -p "m103-application-pass" \\
--port 27000 --db applicationData --collection products \\
--file /dataset/products.json